Equalization or also known as "EQ", is an essential part of audio engineering and music creation as a whole. In such an extensive field, the importance of knowing the basics must be firmly established.
EQ is powerful and it is easy to make things sound worse. I will walk you through how to get the most out of an EQ and understand everything about it!
Understanding the Purpose of EQ in Music Mixing
EQ is one of the most important tools you will have in your tool kit. It is the tool I use the most. 90% of my time spent mixing will consist of levelling and EQing.
So What Is EQ?
Equalizers are a tool that adjusts the gain of targeted frequencies.
The human ear can hear between a range of 20 Hz - 20,000 kHz. All the audible sounds of your song are going to fit somewhere within this frequency range.
Unfortunately songs are made up of 10’s to 100’s of different sounds. And when you have multiple sounds sharing the same space, they can get drowned out and become inaudible.
You use EQ to combat this problem. Songs are really just information, and a good engineer will know what information to cut/keep and what to minimize or emphasize to maintain a solid overall balance between all elements of a song.
You do this with subtractive equalizing and additive equalizing.
There are different types of EQ and different tools for eq's, but they all boil down to subtractive EQ and additive EQ
It may seem scary initially, especially if you have never read a spectrum analyzer before, but once you know how to read the eq it becomes fairly simple.
How To Read an EQ
First things first, there are different tools within an eq and different types of eq's that feature these tools but if you don't understand the frequency spectrum, you won't really know what you are doing.
How to use an Equalizer by learning the Frequency Spectrum
Before we get started with EQ, we first need to understand the frequency spectrum.
The frequency analyzer will be what you use to monitor your frequency ranges. It consists of "frequency" on the horizontal axis, and "volume" on the vertical axis. When a signal is ran through the frequency analyzer, you will be able to see what frequencies are apart of this signal and how loud they are.
Not all eq's will have a frequency analyzer, but they all have a range of frequencies. Some EQ's will have specific frequencies already chosen for you to change the amplitude and others let you choose.
Frequency Range
The frequency range on most eq's will be 0-20,000/40,000 kHz. The left side of the chart will be the lower frequency range (Bass) and moving to the right will be the higher frequencies (Highs).
Sub bass (20-60Hz)
Our initial focus will be on the sub-basses. Everything at 60Hz and below would be considered sub bass. You should use a subwoofer or some good headphones (open back headphones if you are interested in hearing this). You can hear sub on most monitors as well. Listening to it with your laptop or phone doesn't make sense as they will not have that frequency response.
Frequently called: Boomy
Bass (60-200Hz)
We then move on to bass. Bass will be in the range of 60-200hz. Many sounds will be in this range like kick drum, bass, parts of vocals, pianos, guitars, etc. All depends on the notes they are hitting.
Frequently called: Muddy
Low Mids (200-600Hz)
Next up, sounds within the range of 200 to 600 hertz would be called the mid-range, which is an essential area for mixing. The area here is critical in creating a clear mix. Many sounds building up in this area create a very muddy sound.
Frequently called: Boxy, Muddy
Mids (600Hz-3kHz)
The human brain concentrates its focus mainly in this range. This is typically where the vocals sit, and it's also when you get to the more harsher toned frequencies.
Frequently called: Nasally
Upper Mids (3-8kHz)
We have upper mid range between 3kHz and 6kHz. Here we suffer from brightness. Also a key point for clarity in vocal performance.
Frequently called: Harsh, Bright
Highs (8kHz+)
The last category are the highs. The top end range makes elements in your mix sound more up front, and add presence.
Frequently called: Presence, Air
Types of Equalizers
There are a few different types of EQ’s you can use.
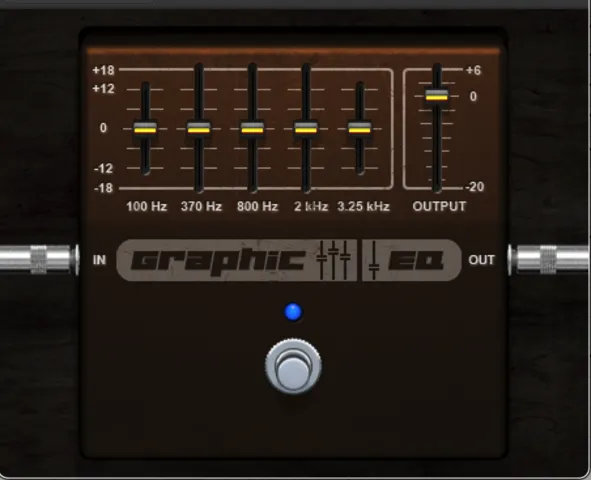
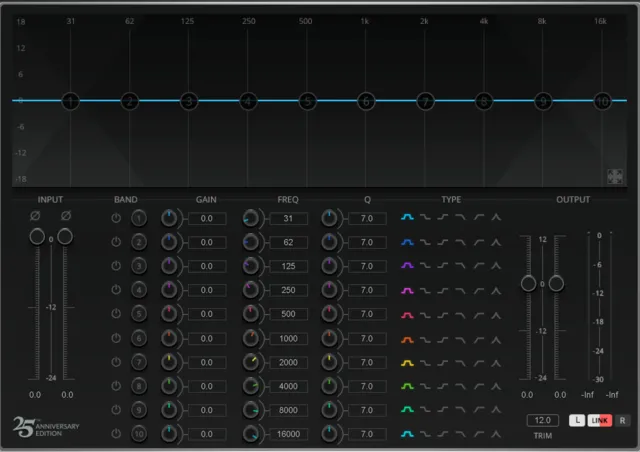
Graphic EQ
Graphic EQ’s consist of bands in the form of sliders that have set frequencies you can adjust.
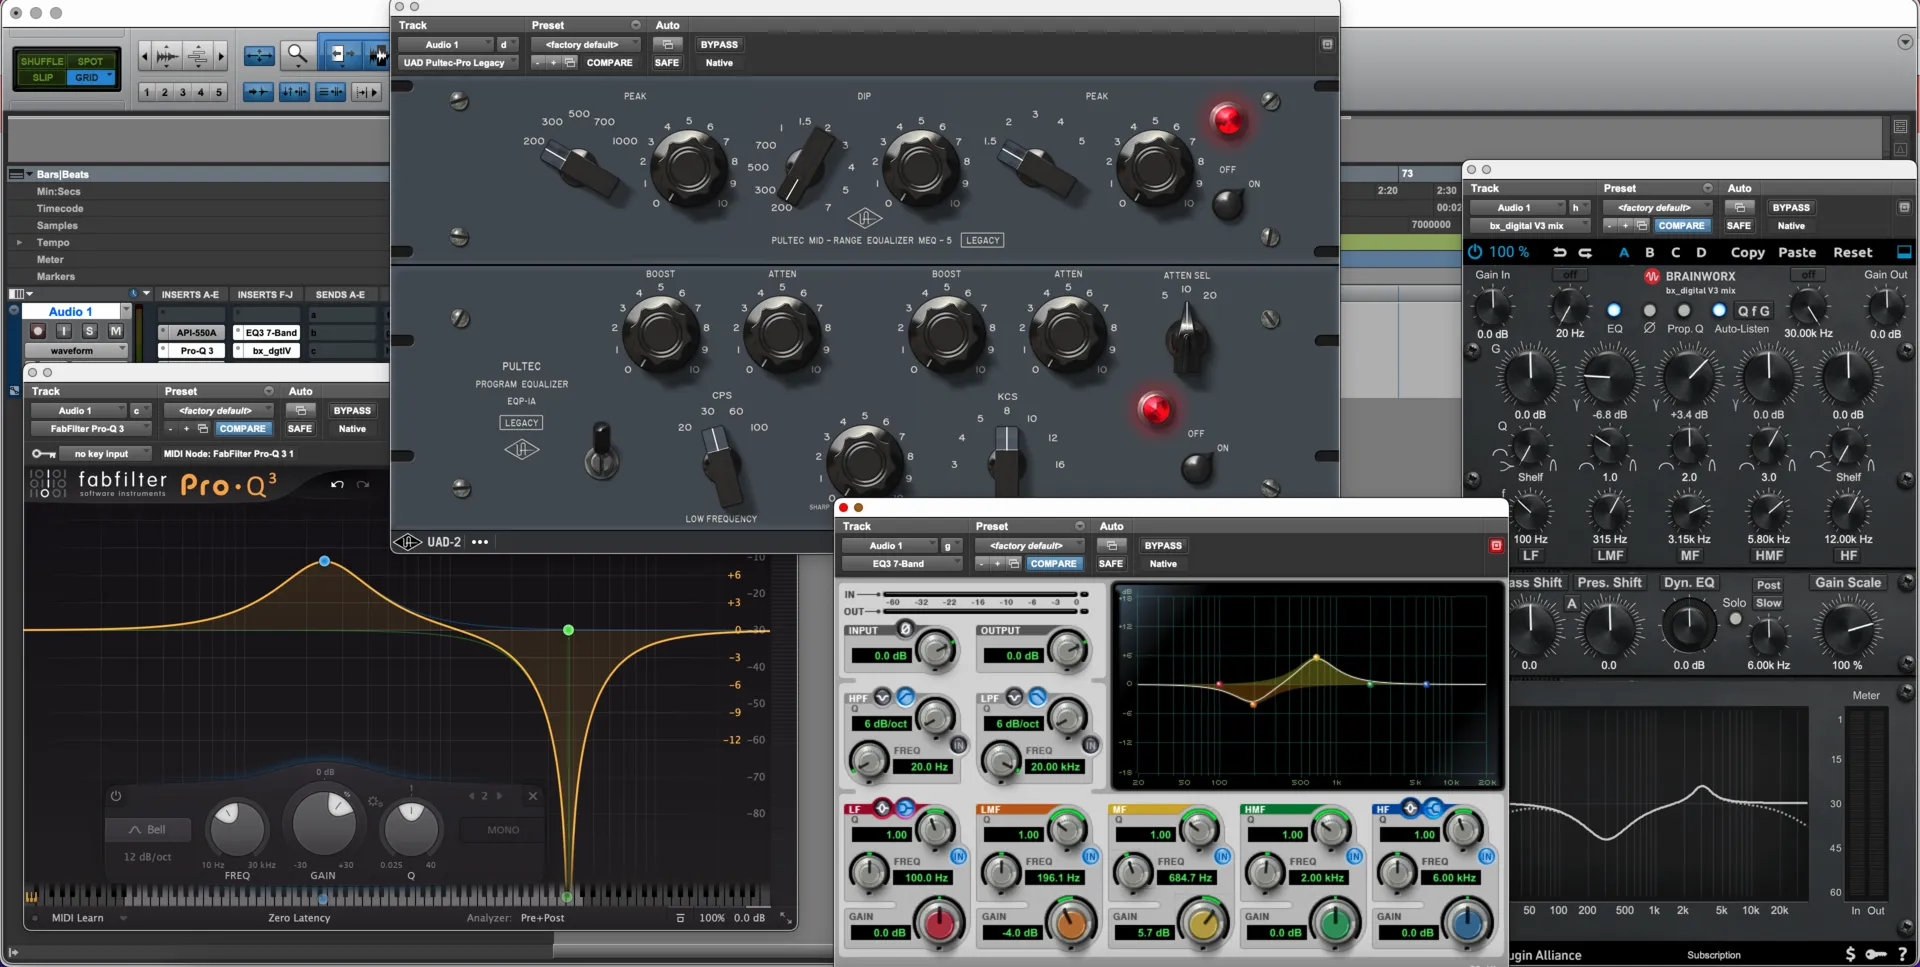
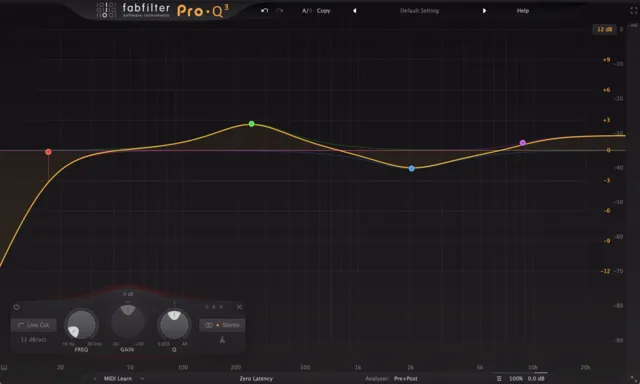
Parametric EQ
Parametric EQ lets you freely choose what frequencies and what tool to use when cutting or boosting. It also displays a spectrum analyzer to see these frequencies.
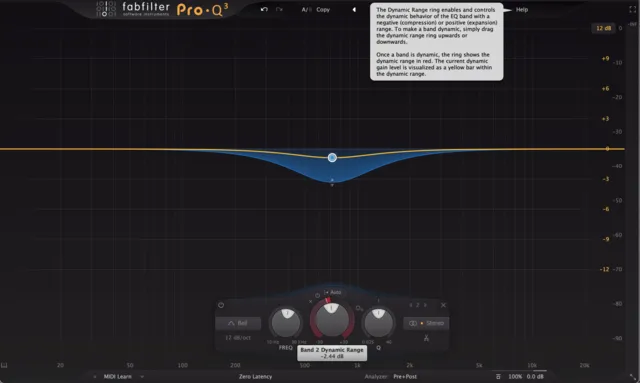
Dynamic EQ
A dynamic EQ is an EQ that lets you boost or cut a frequency, only when that frequency’s volume hits a threshold.
Mid-side EQ
Mid Side EQ lets you EQ the Middle or sides of the stereo field separately.
Tools Within an EQ
EQ’s are equipped with many different tools called frequency bands, that shape the sound differently.
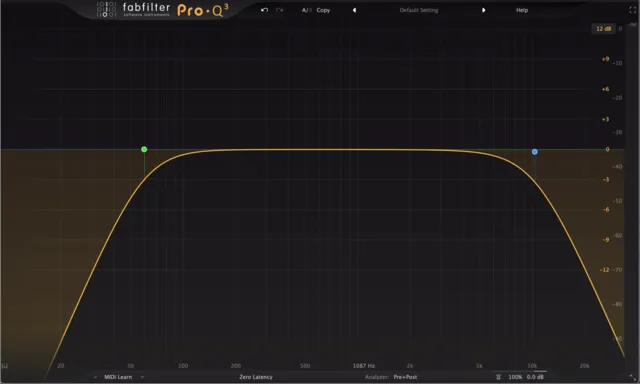
Low Pass Filter & High Pass Filter
Low pass and high pass filters allow you to cut out the low and high end frequencies of a sound.
By setting a cutoff frequency, anything below it will be attenuated.
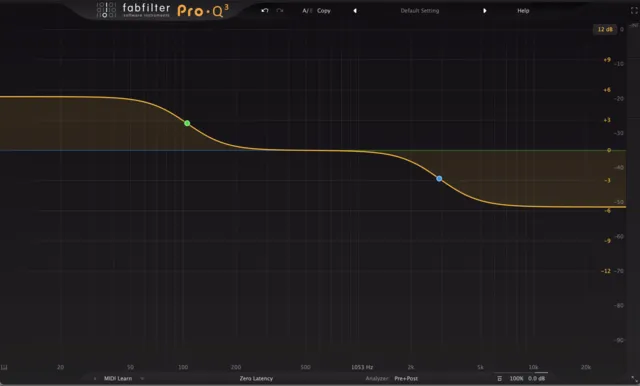
Shelf
Shelf or shelving filters are broader eq curves.
They boost and attenuate either the high end or low end.
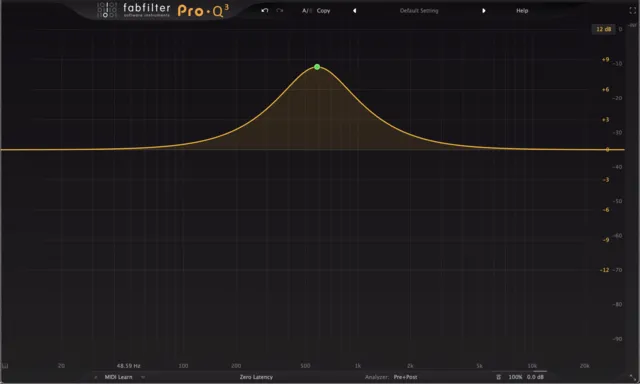
Bell
Narrow band used to target more specific frequencies.
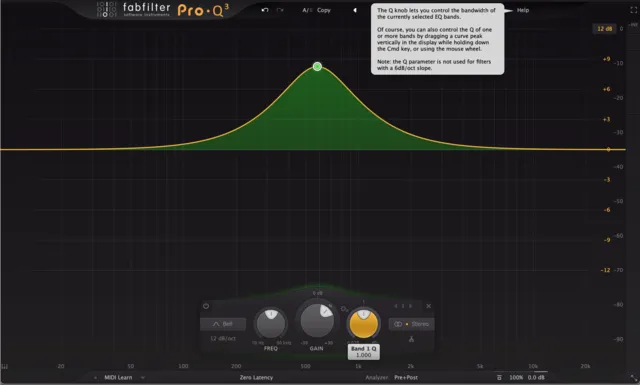
Q
This will be how wide or narrow the boosting or cutting will be. You use this so you only affect the area in which you are targeting, and not the neighbouring frequencies that don't need EQ.
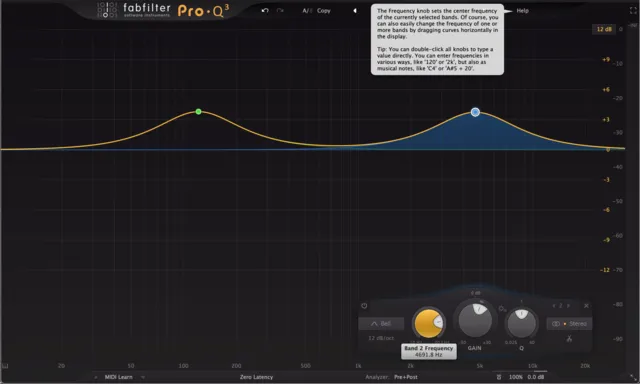
Frequency
This is where you choose which frequency to manipulate.
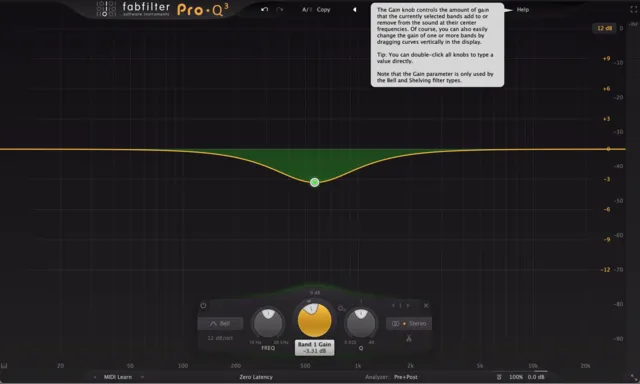
Volume
This knob is used to determine how much amplitude you will apply to the frequency.
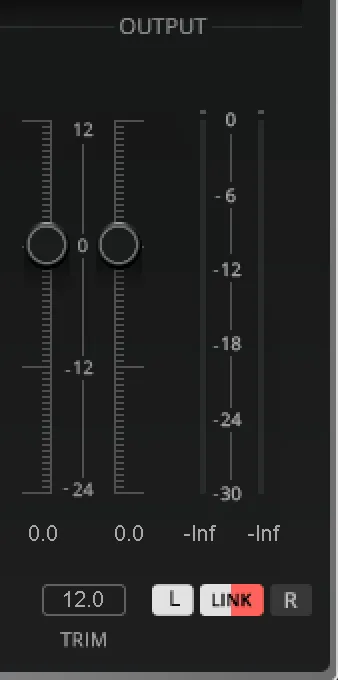
Makeup Gain
Some EQ's will come with an overall volume knob for better gain staging. Especially if you are cutting a lot, it is good to add some more positive gain values after the fact.
Phase Invert
You use this to invert the phase of a signal.
This is used to prevent two sounds who are canceling each other out from doing so. If you invert the phase of one, then they will both be audible.
How to EQ
The very basics of EQ is summed up to attenuating the volume of frequencies. In simpler terms, making certain frequencies in a sound louder or quieter.
Steps
Pick the EQ you want to use
Navigate to the frequency you want to increase or decrease
Make sure you have the appropriate band selected if possible
Raise or decrease the volume until you have your desired sound.
What I usually do while selecting an EQ is determining what my goal with it is. I would say 90% of the time I am using subtractive eq instead of additive eq. For the most part I will use a bell filter.
Here is what my process more in depth looks like.
Process In Depth
I will choose an EQ to use. Different eq's have different sounds associated with them, due to circuitry. If I want a more transparent or I will be making many different EQ cuts and boosts, I will pick a Pro-Q 3 or Q10, which are graphic EQ's. If I am looking for a more broad stroke, or want to add colour I will add a Pultec or Chandler Curve Bender.
I will listen and see what frequency was bothering me by being too loud or too quiet. You can also "sweep" the frequency range if you are in a graphic eq by increasing the volume of the band you are going to use and find the sound that was bothering you.
Making sure I am using the appropriate eq band, whether that be bell filters, a high / low shelf filter or a low pass / high pass filter. Next I will adjust the "q parameter" size to make sure no neighbouring frequencies are caught up in it.
Then I increase or decrease the offending frequencies to the appropriate level.
This is rarely done while soloing an instrument / vocal. this is because you want to know how it sounds in relation to the rest of the song. If solo the instrument / vocal and do your EQing, it will sound different once it is in the mix and might not fit as intended.
I do suggest if you are just starting out to sweep the frequency spectrum and learn what frequencies are causing a lot of the issues. Once you start to get better at analyzing you will learn what sounds good and what doesn't without looking at the analyzer.
Don't be afraid to use different bands. If there is a lot of low end build up, dont just cut it all out with high pass filters, there is probably some necessary frequencies in there, so try and use a low shelf filter slope.
When should you EQ?
You should be eqing when you need to create more space in a mix, there are frequencies within a sound / song that you want to amplify or reduce.
You can add some eq's like a Pultec if you want to run your sound through it for the harmonic distortion it adds.
How do you get good at equalizing?
The only way to get good at eqing is to learn how to listen. For the most part eqing will be to taste. Some frequencies of an audio signal will be a bother to you, but not others.
Choosing what to cut or boost comes down to the sound you are trying to achieve.
Ask yourself before you start boosting or cutting, what sound are you going for with the EQ. Are you trying to cut out frequencies that you don't enjoy? Are you trying to make a sound fit better in the stereo field? Is it clashing with another sound? Is the sound lacking in an area of the frequency range that would sound better if it was boosted?
Once you know what you are doing then you can adjust appropriately. Don't EQ for the sake of eqing.
For example, don't cut a specific frequency because you heard to do it from someone else. Take vocals for example. Maybe you have heard to high pass filter or low pass filter the bottom and top out of a vocal. Although this can be true for some vocals, does the vocal you are processing right now NEED that? Try it out, but don't add it for the sake of adding it, especially if it doesn't add to the quality.
What is an EQ Chart?
EQ chart helps you make intentional decision-making. Then they describe every frequency range using descriptive words to describe their sounds. It is essential that an EQ balances frequencies and should be EQ-level. These charts can help determine where sound imbalances occur. Learn these frequency charts from the heart so that your EQ improves significantly.
This chart is included in Bob Katz book "Mastering Audio"
What to look out for when you are EQing
I highly suggest learning to use your ears instead of looking at a frequency analyzer and mixing with your eyes. Ears > eyes.
But if you are just starting out, it is good to learn the analyzer and see the frequency content.
Resonance Frequencies
The resonance frequency is the natural frequency of the sound. This will look like the largest spike in amplitude.
Build Up
Build up occurs when multiple sources are playing within the same range. This makes everything unclear and you may not be able to distinguish the different sounds in that area.
Especially when it comes to mastering, you should be able to hear this, but if you open the frequency analyzer, you will most likely be able to see where the culprit is.
Transients
You will likely be able to see the transients of an audio signal. Take a kick or snare for example. Open up the frequency analyzer and there should be an initial hit somewhere. You can process transients from here, or through dynamic control as well.
Examples of When To EQ
Here we will go over a few examples of when you can be eqing to add a more quality to your music.
Sub bass (20-60Hz)
Processing the sub bass of sounds will be very common within music production. This range can be dangerous for your music, causing a lot of boominess and bad low end build up. Depending on the sound, it is good to use a high pass filter in this range, especially if you can't necessarily hear it.
Again, there is only so much information that can be in a song. If you can not hear the sub bass of a sound, and cutting it doesn't necessarily hurt the quality, then you can probably cut it. This range is very easy to have build up occur.
Do make sure that you are not over doing it and cutting every sound that is there, that is a good way for your song to sound unnatural.
On the other hand, sub bass is a great place to get bigger sounding kicks and bass. Don't be afraid to boost it with a low shelf filter if a sound or even mix is lacking.
Bass (60-200Hz)
Bass is a tricky area to get right. Having too quiet or too loud of a bass is one of the most common issues in music creation.
If you don't have a well tuned room, great speakers / sub's or a great pair of mixing headphones, it is incredibly easy to run into these issues.
You can get around this by learning what works with what you have, and using references. Also bouncing and listening on a bunch of different playback systems as well.
To create a well balanced bass range, you can use any of the curves.
It is very common to use a high pass filter if your bass is too boomy. You can use a low pass filter to create more space for other instruments in other ranges as well. Just be weary of where your cutoff frequency is! Don't want to cutoff too much.
One of the most common tools I use are shelving filters boost, especially on basses.
You can also use a bell filter to help separate instruments like a kick and bass. Cutting bass where the kicks resonant frequency (& vice versa) is a great way to create space when they share the same frequency space.
Low Mids (200-600Kz)
Low mids in my opinion is one of the greatest enemies of amateur producers/audio engineers. This is where most of your muddiness will come from and it is very easy for it to get out of hand. Don't be afraid to process the low mids out of a lot of sounds.
Again, you will have to use your ears though, don't overdo it, this can cause your songs to sound thin. I generally use a bell filter around this range.
I commonly cut this range out of vocals, especially if they are in a lower register.
Mids (600 - 3kHz)
A lot of harshness will come from around this range. It is also a good place to have things cut through your mix.
A lot of vocals are sitting within this range. Don't be afraid of cutting some others sounds in this range to make room for the vocals. Like always, use your ears.
Upper mids (3kHz - 8kHz)
Another range of frequencies that can add harshness to your mix. Also another great way to add a shine to things. Cutting and boosting with bell filters is common in this range, especially vocals.
Around 4kHz is one of my least favourite areas of a vocal, I find myself cutting this area a lot.
Depending on the microphone or preamp and environment of the recording, I will boost around 5kHz.
Highs (8kHz+)
The highs are a very crucial part to a great sounding mix. Boosting this area can really open up your sounds and is one of the most common areas I high shelf filter.
This is also an area you should consider using a low pass filter. This goes hand in hand with the sub category. If it is not essential for your sound, and it can create more space in the mix for other instruments, then don't be afraid of cutting it out.
Only keep the information that you need, this will help you balance everything out and help them hold their own space.
Conclusion
You should have a better understanding of how eq works and when you should be using it in your composition. It may take a while to fully understand what to eq and how to achieve the best balance in your mix.
Just keep using it and remember to use your ears the most. You should be eqing with a purpose, not for the sake of it.
Sign up for our newsletter, for exclusive mixing & mastering tips!